This blog will give the solution and fix for Active Directory and Messaging administrators

  • A directory is a hierarchical structure that stores information about objects on the network. Active Directory Domain Services (AD DS), stores information about objects on the network like user accounts, such as names, passwords, phone numbers, and so on, and enables other authorized users on the same network to access this information. Active Directory uses a structured data store as the basis for a logical, hierarchical organization of directory information.

  • Microsoft 365 is a cloud-based services designed to help meet your organization's needs for robust security, reliability, and user productivity.

  • Microsoft Learning

    Learn technical skills with Microsoft role based certifications, find the right training and certification opportunities to aid in your career growth and success.

  • Microsoft Exchange Online is a hosted messaging solution that delivers the capabilities of Microsoft Exchange Server as a cloud-based service. It gives users access to email, calendar, contacts, and tasks from PCs, the web, and mobile devices. It integrates fully with Active Directory, enabling administrators to use group policies, as well as other administration tools, to manage Exchange Online features across their environment

  • Powershell

    A comprehensive command line interface and scripting language for Windows. Introduced in 2006, PowerShell is a major upgrade from the Windows command line, which uses DOS commands. PowerShell supports common programming structures such as "if-then-else" and "while," it is generally less complicated than Microsoft's VBScript and JScript languages.

How to add trusted sites in internet explorer

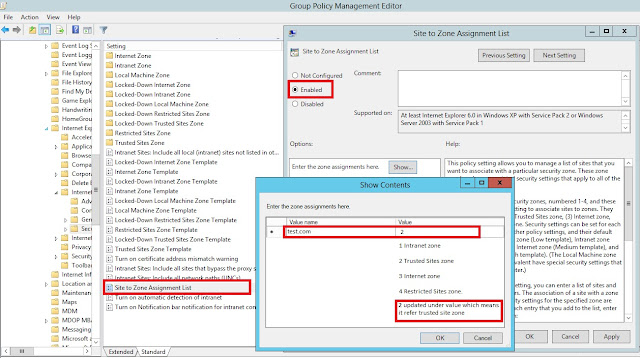
Internet Explorer classified websites security zones, Internet Explorer has 4 security zones, numbered 1-4, and these are used by this policy setting to associate sites to zones. This security zones provides a different level of security in IE. Internet explorer block the websites functionality due to this, to avoid this we can add websites in to specific zones and it controls the level of security for the website. 

(1) Intranet zone
(2) Trusted Sites zone
(3) Internet zone
(4) Restricted Sites zone.

How to add trusted sites in internet explorer: Windows offers below methods to add trusted sites.,

Manually add trusted sites in Internet explorer - this option will not be work if these settings are managed by group policy.
Internet explorer -> Internet Options -> Security tab -> Trusted Sites -> Add the websites to the zone.

Add trusted sites via Registry (this can be achieved via scripts)
In windows, most of the settings resides on registry. We can use the same to update trusted sites, best practice to go with HKEY_CURRENT_USER.
HKEY_CURRENT_USER\Software\Policies\Microsoft\Windows\CurrentVersion\Internet Settings\ZoneMapKey
KEY_LOCAL_MACHINE\Software\Policies\Microsoft\Windows\CurrentVersion\Internet Settings\ZoneMapKey

Add trusted sites via Group policy
User Configuration -> Administrative Templates -> Windows Components -> Internet Explorer -> Internet Control Panel -> Security Page -> Site to Zone Assignment List

Share:

How to Manage Manager's Team Calendar (Outlook doesn't display manager's team calendars)


Team calendar is a group calendar which includes all reporters calendar who all comes under Manager...
Example: if manager has 10 reporters and "manager" attribute updated properly in Active Directory accounts then "Team: Manager" calendar will be auto populated in outlook.

Note: Team calendar will work up to 100 members and it will not work if manager has more than 100 reporters.

How to Enable Manager's Team Calendar in Outlook:

  1. In Outlook --> Calendar.
  2. Go to Home menu tab, click on Calendar Groups.
  3. Select the option "Show Manager's Team Calendars".


How to enable "Show Manager's Team Calendars" setting if not available in outlook..,

Start menu then search and select  Run (windows key + R). Type regedit, and then click OK.
locate the the below registry key path and modify the value...

Outlook 2010
HKEY_CURRENT_USER\Software\Microsoft\Office\14.0\Outlook\Options\WunderBar
HKEY_CURRENT_USER\Software\Policies\Microsoft\Office\14.0\Outlook\Options\WunderBar

Outlook 2013
HKEY_CURRENT_USER\Software\Microsoft\Office\15.0\Outlook\Options\WunderBar
HKEY_CURRENT_USER\Software\Policies\Microsoft\Office\15.0\Outlook\Options\WunderBar

Outlook 2016 / 2019
HKEY_CURRENT_USER\Software\Microsoft\Office\16.0\Outlook\Options\WunderBar
HKEY_CURRENT_USER\Software\Policies\Microsoft\Office\16.0\Outlook\Options\WunderBar

Value name: DisableReportingLineGroupCalendar
Value Data:

How to Manage Managers Team Calendar's:

We cannot change or modify calendar in Outlook because it is controlled by Active Directory user account Organization tab "Managers".

TO remove or add a name to the "Team: Calendar"
Option 1: Go to Active Directory and find the user and go to user properties.
Select Organization tab then update or remove the "Manager" for the account.

Option 2: In Exchange admin center, Recipients --> Mailboxes --> find the user
Then select Organization tab then update or remove "Manager"

Note: For hybrid setup, you have to modify in your on-prem environment.

For more details: https://support.microsoft.com/en-au/help/3163350/outlook-doesn-t-display-your-manager-s-team-calendars
Share:

Exchange Cumulative Update Step by Step

Microsoft Exchange Server 2013 Cumulative Update 23. Because each CU is a full installation of Exchange and it include updates and changes from all previous CUs, you don't need to install any previous CUs or service packs.

Pre-Requisites:
  1. We have to do to schema and AD preparation for CU23 and require enterprise and schema admin rights.
  2. .Net 4.7 required NDP472-KB4054530-x86-x64-AllOS-ENU
  3. Backup web.config files if you done any customization because it will be over written with default settings. 
Step by Step CU23 installation:

Step 1: Download and copy the installation file (Exchange2013-x64-cu23.exe) - Download

Step 2: Move all the databases mounted on the server which you are going to perform the installation using below command. Once moved, check all the DB's are healthy.
Move-activemailboxdatabase –server "Servername" -skipclientexperiencechecks

Step 3: Run the below commands in Exchange management shell to keep the server components in maintenance mode.
Set-ServerComponentState "Servername" –Component HubTransport –State Draining –Requester Maintenance
Set-ServerComponentState "Servername" –Component ServerWideOffline –State InActive –Requester Maintenance
Set-MailboxServer "Servername" -DatabaseCopyAutoActivationPolicy blocked

Step 4: .Net Frame work 4.7 required, install it using below file available under D:\Softwares
NDP472-KB4054530-x86-x64-AllOS-ENU
Extract the CU24 installation file to D:\CU23 by running Exchange2013-x64-cu23.exe

Note: Kindly verify whether D drive is having enough free space to extract the files (at least 20-30GB).

Step 5: Open command prompt with admin rights and navigate to the path D:\CU23. Run the below commands to prepare AD.
            Run setup.exe /PrepareSchema /IAcceptExchangeServerLicenseTerms (requires Enterprise Admins and Schema Admins permissions, and must be performed in the same AD Site)

Run setup.exe /PrepareAD /IAcceptExchangeServerLicenseTerms

Run setup.exe /PrepareDomain /IAcceptExchangeServerLicenseTerms in each domain in your forest that contains Exchange servers or mailboxes

Step 6: Setup /m:upgrade /IacceptExchangeServerLicenseTerms
Example: D:\CU23>Setup /m:upgrade /IacceptExchangeServerLicenseTerms

Note: During the installation you might get below errors.
Error 1: You might get error to restart the server. Restart the server and rerun the installation using the command mentioned in step 6.
Error 2: Some processes will be in running state and you need to end that process using below command. This command to be executed against all processes which will be shown during installation
taskkill.exe /pid <processID> /f     (Example: taskkill.exe /pid 14684 /f)
Process id will be displayed in the error. Once the processes are killed, rerun the installation using the command mentioned in step 6 (setup /m:upgrade /IacceptExchangeServerLicenseTerms)

Step 7: Once the installation is completed restart the server.

Step 8: Once the server rebooted then resume the cluster node in failover cluster management.

Step 9: Run the below commands in Exchange management shell to bring back the server components to active state.
Set-ServerComponentState "Servername"  –Component HubTransport –State Active –Requester Maintenance
Set-ServerComponentState "Servername"  –Component ServerWideOffline –State Active –Requester Maintenance
Set-MailboxServer "servername" -DatabaseCopyAutoActivationPolicy unrestricted

Step 10: update the web.config files, if any customization.

========================================================================

Exchange Health checks after successful installation:


Perform the health checks after the installation.

1.       Verify the exchange version using the below command
a.      Get-exchangeserver “servername” | fl name,*version*
b.       The AdminDisplayVersion should be “Version 15.0 (Build 15.00.1497.002)
2.       Verify the mail queue using the below command
a.      Get-queue “servername”
3.       Verify the services health using the below command
a.      Test-serviceshealth
4.       Verify the replication using the below command
a.      Test-replicationhealth
5.       Verify the copy status of databases
a.      Get-mailboxdatabasecopystatus –server “Servername”
6.       Verify the mail flow using the below command
a.      Test-mailflow
7.       Verify the MAPI connectivity using the below command
a.      Test-mapiconnectivity
8.       Verify the OWA and ECP console connectivity for client access servers.

Note: For each server the installation will take 2 hours approximately.
========================================================================


Share:

WARNING: An unexpected error has occurred and a Watson dump is being generated: Connect-Mailbox

Day to day we have to face some challenges in exchange and learn new things about it. Let us learn about how to connect disconnected mailbox and error message and how to fix it.
we can use the exchange admin center (EAC) or the Shell to connect a disabled mailbox to an user account. Exchange retains the disabled mailbox in the mailbox database disabled state. 

But, Exchange attributes were removed from the corresponding user account, but the user accounts still retained available until we delete it. Also, the mailbox is retained until the deleted mailbox retention period expires, which is 30 days by default, and then it's permanently deleted (or purged) from the mailbox database and mailbox cannot be connected. 

"To check the retention period you can use Get-MailboxDatabase | FL *retention*"

we can connect and use or export the the disabled mailbox data until permanently deleted from the Exchange mailbox database, it can be done EAC or the powershell to reconnect it to the original or another Active Directory user account.

Connect the Mailbox via Powershell:

Connect-Mailbox -Identity "DisplayName or GUID" -Database "DatabaseName" -User "TargetUser" 

Connect the Mailbox via Exchange Admin Center (EAC):
  1. Open Exchange Admin Center (EAC) --> Recipients --> Mailboxes.
  2. Click More More Options (...), then click Connect a mailbox.
  3. A list of mailboxes will be displayed, like... disconnected mailboxes includes disabled mailboxes, deleted mailboxes, and soft-deleted mailboxes.
  4. Click the disabled mailbox that you want to reconnect, and then click Connect.
While doing this we will get some error like below, it happens because of LegacyDN, 
The error message you can get it from EAC...

The LegacyDN "LegaacyDN value" is in use by the following user in Active Directory: "username". The value for LegacyDN must be unique to each user.

Error message in Powershell:

[PS] C:\Windows\system32>Connect-Mailbox  -Identity <Mailbox ID> -User <UserMailbox> -Archive -Database  <Database name>

WARNING: An unexpected error has occurred and a Watson dump is being generated: Object reference not set to an instance of an object.
Object reference not set to an instance of an object.
    + CategoryInfo          : NotSpecified: (:) [Connect-Mailbox], NullReferenceException
    + FullyQualifiedErrorId : System.NullReferenceException,Microsoft.Exchange.Management.MapiTasks.ConnectMailbox
    + PSComputerName        : Server name


To fix this, we can use -AllowLegacyDNMismatch switch allow to connect the mailbox

Connect-Mailbox -Identity "DisplayName or GUID" -Database "DatabaseName" -User "TargetUser"  -AllowLegacyDNMismatch


Share:

Active Directory Ports for client communication

1.2 active directory
Active directory required port communication between forest to forest | domain to domain | clients to domain controllers. Below are the port details which we have to allow for successful communication.

In general, firewall separates the domain controllers communication, ports to be allowed in firewall.

All below listed ports are not required in all scenarios. For example, if the firewall separates members and DCs, you don't have to open the FRS or DFSR ports. Also, if you know that no clients use LDAP with SSL/TLS, you don't have to open ports 636 and 3269.

UDP Port 88 for Kerberos authentication
UDP and TCP Port 135 for domain controllers-to-domain controller and client to domain controller operations.
TCP Port 139 and UDP 138 for File Replication Service between domain controllers.
UDP Port 389 for LDAP to handle normal queries from client computers to the domain controllers.
TCP and UDP Port 445 for File Replication Service
TCP and UDP Port 464 for Kerberos Password Change
TCP Port 3268 and 3269 for Global Catalog from client to domain controller.
TCP and UDP Port 53 for DNS from client to domain controller and domain controller to domain controller.
udp 123 for time service
udp for netlogon and netbios
TCP 139
Client Port(s)
Server Port
Service
49152 -65535/UDP
123/UDP
W32Time
49152 -65535/TCP
135/TCP
RPC Endpoint Mapper
49152 -65535/TCP
464/TCP/UDP
Kerberos password change
49152 -65535/TCP
49152-65535/TCP
RPC for LSA, SAM, Netlogon (*)
49152 -65535/TCP/UDP
389/TCP/UDP
LDAP
49152 -65535/TCP
636/TCP
LDAP SSL
49152 -65535/TCP
3268/TCP
LDAP GC
49152 -65535/TCP
3269/TCP
LDAP GC SSL
53, 49152 -65535/TCP/UDP
53/TCP/UDP
DNS
49152 -65535/TCP
49152 -65535/TCP
FRS RPC (*)
49152 -65535/TCP/UDP
88/TCP/UDP
Kerberos
49152 -65535/TCP/UDP
445/TCP
SMB (**)
49152 -65535/TCP
49152-65535/TCP
DFSR RPC (*)

Protocol

TCP
UDP
ICMP
RDP
Remote Desktop
3389


DNS
DNS Download
53


DNS Queries

53

WINS Replication
WINS
42


WINS

42

ICMP
echo-request


8

info-request


15

mast request


17

timestamp


13
NetBIOS Services
Name Resolution Service 
137
137


Datagram  Services (Browsing)

138


Session Service (net use)
139


SMB
Input
445


Output

445

Remote Storm

1025


NTP
NTP
123


NTP

123

Content Replication
Content_Repl
507


Kerberos
Kerberos-Secure

750


Kerberos_v5
88 + 464


Kerberos_v5

88 + 464

LDAP
LDAP
389


LDAP

389


LDAP over SSL/TLS
636
636


Global Catalog
3268


Global Catalog over SSL/TSL
3269


Replication
Active Directory
RPCSS Dynamic


FRS
RPCSS Dynamic


Microsoft CIFS
Microsoft-CIFS (DS) 
445


Microsoft-CIFS (DS)

445

RPC – Cert Services (+)
RPC
135


SNMP
SNMP Agent

161


SNMP Trap
162


ASP.Net State Service

42424


Link State Algorithm Routing

691


TCP – High Ports  (Cert Services)
> 1023
1024 - 65535


Reference: https://support.microsoft.com/en-us/help/179442/how-to-configure-a-firewall-for-domains-and-trusts
Share:

Registry key to disable USB Storage Device


Pen drive Write Protect Using registry Value

HKEY_LOCAL_MACHINE\SYSTEM\CurrentControlSet\control\StorageDevicePolicies
Value Name : WriteProtect
Value Type : Dword Value
Value Data: 1 (value data: 0 to reset)

****************************************************************
Usb Storage Device Enable or Disable
Disable USB
HKEY_LOCAL_MACHINE\SYSTEM\CurrentControlSet\Services\USBsTOR

Value Name : Start
Value Type : Dword Value
Value Data : 4


Enable USB
HKEY_LOCAL_MACHINE\SYSTEM\CurrentControlSet\Services\USBsTOR
Value Name : Start
Value Type : Dword Value
Value Data : 3

****************************************************************
Share:

Search This Blog

Recent Posts